Showing posts with label World of Love Adam. Show all posts

Friday, March 17, 2017

Dyeing to be Black - Part 6 Finale

Completed ladies:  Babette by EG, unmarked clone, Davtex clone, Twistee Totsy, and 35th Anniversary Barbie

As shown above, the dyeing, painting, extra detailing, and dressing of all dolls has been completed.

Babette is dressed in the 1965 Barbie fashion #1631 Aboard Ship.  Here, she wears it without the jacket.

Preferring to wear it with the sleeveless jacket, Babette took another photo.  The fashion came with a camera, which is stored.  The fashion is missing these three travel brochures.

The unmarked, bubble cut clone is dressed in the reproduction Barbie Poodle Parade fashion.  (She's missing her poodle and the original olive green shoes, which had been substituted for white pumps in the above photo.)  I thought olive green shoes would look better.  So....


...after mixing acrylic paints (black, yellow, and a dab of white), I created olive green paint and painted the white pumps the desired color, as shown above.


Yes, the Poodle Parade fashion looks much better with shoes dyed (I mean painted) to match.

Recall that the above two clones use the two newer Barbie bodies that I dyed.  Until I find a body for the Davtex clone, I am using a So in Style Chandra body, which was the closest complexion match I had on hand for her.

Davtex clone head on So in Style Chandra body and custom dressed
The Davtex doll wears a two-piece purple, So In Style Club-exclusive silk shantung fashion by doll fashion designer, MashauDe'.  It is tailored to fit the S.I.S. doll hips. I think Chandra might have a difficult time getting her body and fashion back.  I made Ms. Davtex a pearl necklace and matching bracelet to somewhat match her original teardrop-shaped pearl earrings.

After being redressed, Twistee Totsy was returned to the confines of her original box.  She is giving some serious side-eye as a result.


Likewise, 35th Anniversary Barbie returned to her box. 

Joe and Adam took final photos together.
I consider my first attempt at using iDye Poly to deepen the complexion of dolls a relative success. The complexions did deepen, although I was not prepared for the extra detailing required on the parts that did not absorb the dye.

Here are some tips for those who might want to try this:


  • For your first attempt, use inexpensive vinyl/hard plastic dolls, such as thrift store finds. 
  • Do apply the dye powder and enhancement packet to boiled water and stir well.  If you want to achieve a lighter brown, allow the water to cool some before adding the dolls.  The water still needs to be relatively warm for the vinyl/hard plastic to absorb the dye.  I believe the hottest water achieves the darkest results. The water was warm when 35th Anniversary Barbie was dipped.  As a result, her complexion did not deepen as much as the rest.  (According to the iDye Poly instructions, dyeing for clothes is supposed to be done on the stovetop in a pot of boiled water.  I did not have an old pot to use and thought my alternate method would work just as well, besides I was dyeing dolls, not clothes.)
    • It would be wonderful if iDye Poly was available in variations of brown or perhaps if colors could be mixed to blend a desired hue.
    • Rit DyeMore can also be used for dyeing plastics.  Since it is liquid, colors can probably be blended to create desired complexions and/or hair colors.  (Here's a video of a troll toy being dyed with Rit DyeMore.)
  • After dyeing, if you must paint any areas of the doll, a spray gun would work better. I do not own one.  If I had to do it over again, I would prime the painted areas first.  Because I did not prime, several layers of paint were required and the paint on the first several layers would easily chip.  It will still chip, but I am careful handling the painted areas of those dolls.
    • For the final painted layers, I mixed matte varnish with the acrylic paint, which I should have done with all layers to eliminate some, if not all chipping.  
    • Sealing painted areas is optional and probably best.  


dbg
Follow my sister blog Ebony-Essence of Dolls in Black
Check out my eBay listings here.

Wednesday, March 15, 2017

Dyeing to be Black - Part 5, Shoes for Adam


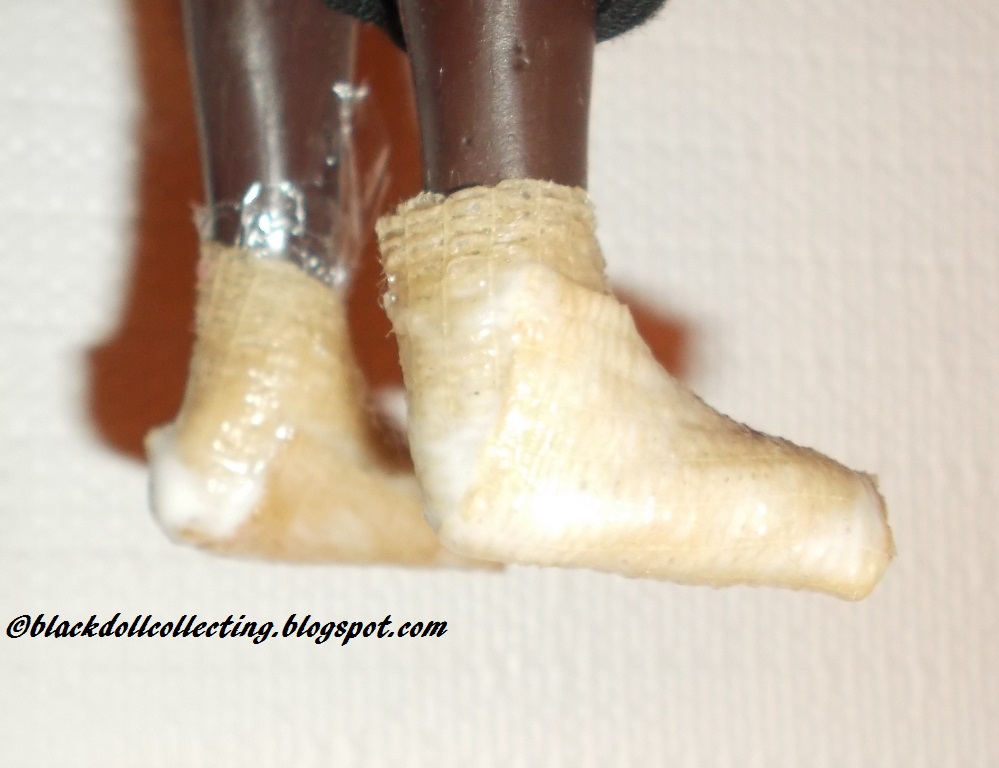
Saran wrap, self-adhering bandage, and several layers of Mod Podge were used to make shoes for Adam.
Adam needed shoes to wear with the original World of Love Sports Gear outfit he would continue wearing after the dyeing process.  Instead of trying to locate shoes for him, which would be difficult due to his small foot size, I decided to make a pair.

Adam's feet were:

  1. Wrapped with Saran wrap to protect them from any Mod Podge that might seep through the self-adhering bandage used to mold the shoes.  
  2. Next, his feet were wrapped with the bandage.
  3. Several layers of Mod Podge were applied over the bandage, allowing each layer to dry before applying the next.
The next several photos illustrate the shoe-making process.

Adam's feet have been wrapped and layered with Mod Podge, as described previously.  After the desired firmness was achieved, the shoe molds were removed from each foot and the excess cut away from the ankle area to form the proper shape.

The bottom of each shoe was traced onto black foam to create soles.  These were cut out and glued to the bottom of the shoes and held in place with plastic bands while the soles dried.

Side view of the glued-on, temporarily banded soles

Heels were added to the shoes with additional black foam cut to the shape of the heel area.  The sole of one shoe is not as flat at the other.  I used quilting pins to hold the heel in place on that shoe while the glue dried.

Another angle of the heels as they dried

Insoles were made with white card stock by tracing Adam's foot.  These were inserted into the shoes.  The shoes were painted with black matte acrylic paint.

Mock laces were painted on. 

The shoes, while not perfect, are a nice complement to Adam's sports fashion, which was actually made for one of the World of Love female dolls, but Adam doesn't mind.  I might make him a dashiki later.

World of Love Soul  (who was not part of the dyeing project) is part of Adam's doll family.  She loves his deep complexion, Afro, clothes, and his shoes!  A man is often judged by his choice of shoes, you know.  

See the final reveal of the three Barbie clone heads in the Dyeing to be Black finale.

dbg
Follow my sister blog Ebony-Essence of Dolls in Black
Check out my eBay listings here.

Wednesday, March 8, 2017

Dyeing to be Black Part 2 - Initial Results


Adam's body and head, two Barbie bodies, Twistee Totsy's body and her head after the dye bath

In the previous post, the initial phase of dyeing several white dolls black (or brown) using brown iDye Poly was shared.  This post will share the initial effects the dye bath had on each doll.


Adam:


Adam's neck and torso did not absorb the dye.  His lips and eyes retained their color.  His molded hair and complexion are now ebony.

Twistee Totsy's Hair Close-up:

Twistee's formerly light blonde hair is now a dishwater blonde color.  You'll see how this was corrected in a follow-up post.


Babette, the unmarked Barbie clone, and vintage Barbie clone by Davtex:


Babette and the unmarked clone now have Ebony complexions (see their before image here).  Babette's previous brunette hair with highlights is now a reddish-brown.  The formerly blonde bubble cut clone is now a brunette with gold highlights.  The Davtex doll's face would not absorb the dye, as illustrated above.  She was a "piece of work."

GI Joe:


Joe's eyes, hair, his facial scar, joints, and feet did not fully absorb the dye.  The writing on his shirt remained visible.  He required more time to complete as well.

35th Anniversary Barbie:


As illustrated in her initial after-dye photos, 35th Anniversary Barbie's eye and lip color were unaffected by the dye.  Her body, unfortunately, is much lighter than her face, arms, and legs.  The dye over-penetrated some areas on her chest and in small areas on one side of her face and upper arm.  How I was able to deepen her torso and mask the coloring imperfections will be shared in Friday's post.

******

Each doll required extra detailing beyond dyeing, some more than others.  I worked on more than one doll at a time and took pictures along the way.  If painting was being done, those dolls that needed it were painted.  If hair needed to be styled, that was done.   To keep the posts relatively brief, I had to make this a multi-part series.  Some posts, however, will focus more on some dolls than others.  

Part 3

dbg
Follow my sister blog Ebony-Essence of Dolls in Black
Check out my eBay listings here.